
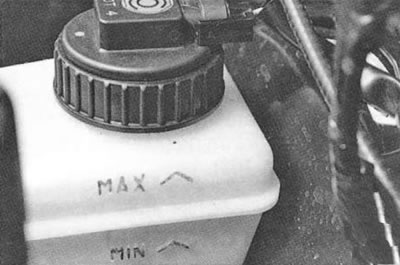
Warning: Check the brake fluid level in the master cylinder reservoir regularly. The brake fluid level should be around the mark «MAX» on the tank body.
A drop in the fluid level indicates either a leak in the brake fluid system or excessive wear of the brake pads. If the low brake fluid light comes on in the instrument cluster, do not rush to top it up immediately, first check the thickness of the brake pad linings: it may be time to replace the pads.
Car manufacturers recommend replacing all brake fluid in the system after 90,000 km or 4 years (whichever comes first).
Some drivers ignore this advice because the fluid in the reservoir seems clean enough to them, and this is completely in vain. The fact is that brake fluid is very hygroscopic: it absorbs moisture from the air, which over time not only destroys the surfaces of brake cylinders, pipes and, as a result, leads to premature failure of brake system components, but also significantly reduces the boiling point of the brake fluid. The normal boiling point of DOT-4 brake fluids is 210-260°C. With frequent intensive braking, disc brakes heat up very much and with a high water content, the brake fluid can boil, which, as a rule, leads to brake failure.
Helpful advice: In order to avoid unexpected expenses in the future for repairs not only of the brake system, but of the entire car, it is better to replace the fluid in the brake system in a timely manner.
We recommend replacing the brake fluid every 2 years.
If you have problems with your brakes, bleed the brake system (see «Bleeding the hydraulic brake system»). If this does not produce the desired result, it is necessary to thoroughly check the entire brake system as described below (see «Checking the efficiency of the braking system»).
Bleeding the brake system
If the brake pedal has become «soft», and with several successive presses it becomes «harder», which means that air has entered the hydraulic brake drive.
To remove air from the system, you need to bleed the brakes. The procedure for bleeding the brakes is quite simple, but it is more convenient to do it with an assistant.
A detailed description of bleeding the brake system can be found in Section 9 «Brake system» (see «Bleeding the hydraulic brake system»).
Checking the brake system
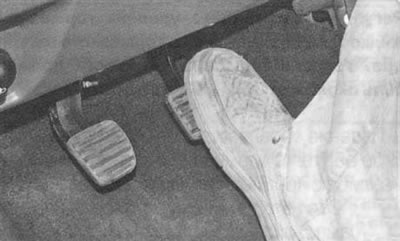
1. The reason for the loss of braking efficiency may be poor operation of the vacuum booster. To quickly check it, press the brake pedal several times with the engine off to remove the vacuum in the booster, and then, holding the pedal, start the engine. If the pedal drops slightly after starting the engine, the vacuum booster is working properly.

2. If the pedal remains motionless, check the integrity and reliability of the connection of the vacuum booster hose to the fitting on the engine intake pipe...
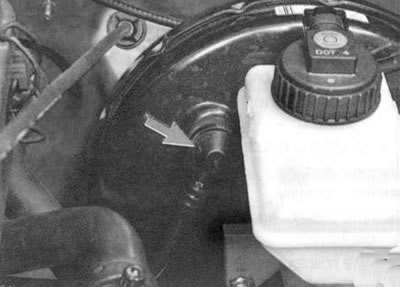
3....and with the booster. Replace or repair the faulty hose. If the hose is OK, the vacuum booster must be replaced (see «Replacing the brake booster»),
Note: The vacuum booster hose is made in one piece with the check valve. Check its functionality (see «Checking the operation of the brake booster»»). If the check valve is faulty, replace the vacuum booster hose assembly.
If braking is accompanied by beating and pulsation of the brake pedal, you should first check the condition of the front disc brakes.
Note: Periodically appearing and disappearing vibration of the pedal during sharp braking accompanies the operation of the anti-lock braking system and is not a sign of a malfunction.

4. After jacking up the car, remove the front wheels one by one and inspect the brake discs. The thickness of the brake disc should be at least 10.6 mm, the disc surface should be even and smooth on both sides. If the disc surface is covered with rust in places, which usually happens after the car has been parked for a long time with un-dried brakes, try cleaning the working surface with fine sandpaper. If this procedure does not help, you will have to send the discs for grinding or replace them with new ones.
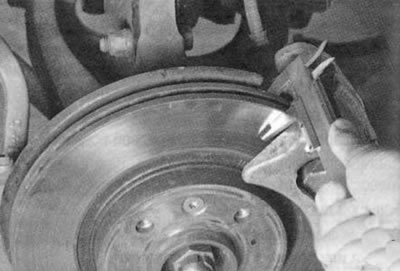
Note: Cars with K4M engines are equipped with ventilated brake discs, the minimum permissible disc thickness is 17.7 mm.
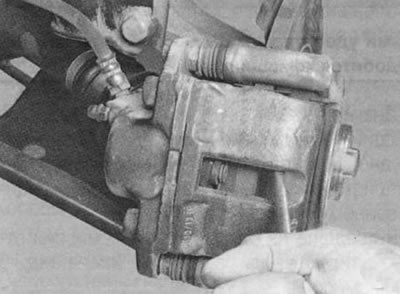
5. Check the mobility of the brake piston. To do this, try to move the brake caliper with a screwdriver. If the caliper cannot be moved, then the piston is jammed in the brake cylinder.
Warning: Jamming of the brake cylinder piston results in constant braking of the corresponding wheel when the pedal is released and skidding of the car when braking.
If braking is accompanied by jerking of the car and creaking in the area of the rear wheels, and also if the rear of the car skids during intensive braking, check the condition of the drum brakes of the rear wheels.
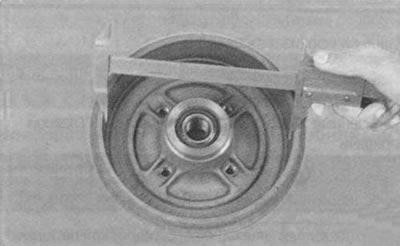
6. After placing the car on a jack, remove the rear wheels one by one and remove the brake drums (see «Removing and installing the brake drum») and measure the diameters of their working surfaces. The inner diameter of the drum should be no more than 204.45 mm, the working surface of the drum should be even and smooth, without ring marks and clearly visible ovality (ovality can be determined by the unevenly worn working surface of the drum). If the internal diameter of the drum is larger than the permissible value, the ring marks are very deep or uneven wear of the working surface is clearly visible, the drum will have to be replaced with a new one.
Note: The parking brake applies the rear brakes via a cable that connects the parking brake lever to the brake shoe control mechanism. Many drivers try to use the parking brake as little as possible to extend its life «life», and achieve the opposite result. If you do not use the parking brake, dirt and moisture stagnate in the cable sheaths, the cable becomes covered with rust, stops moving and breaks. Therefore, use the parking brake whenever necessary, but do not forget to adjust its drive from time to time (see «Adjusting the parking brake drive»).