Adjustment
1. Place the rear of the car on jack stands.
2. Disconnect the parking brake lever.
3. Depress the brake pedal several times to achieve the desired self-adjustment.
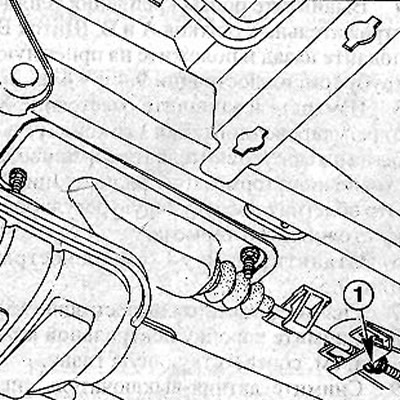
4. Loosen the adjusting nut 1 and unscrew it to the very end of the drive cable equalizer fastening pin (see illustration).

8.4 Loosen adjusting nut 1 and unscrew it to the very end of the fastening pin of the drive cable equalizer
Vehicles with rear drum brakes
5. Remove the brake drum.
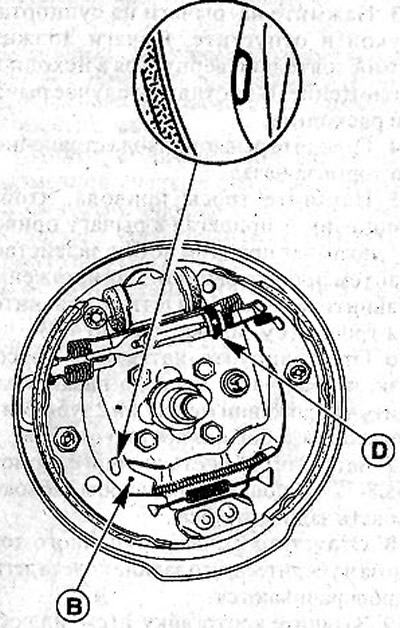
6. Check the ease of movement of the automatic adjusting device by rotating gear D in both directions (see illustration). After that, unscrew the gear by 5-6 teeth to loosen the position of the expander bar.

8.6 Check the ease of movement of the automatic adjusting device by rotating gear D in both directions
7. Make sure that the shoe drive cables are easy to move.
8. Make sure that lever B of the shoe drive is adjacent to the shoes (see illustration 8.6).
9. Gradually tension the drive cables by screwing nut 1 on the cable equalizer pin (see illustration 4.8), so that the pad drive levers on the right and left brake mechanisms begin to move away from the pads in the position between 1 and 2 teeth, and completely move away on the second tooth.
10. Reinstall the brake drums.
11. Lower the car on wheels.
12. Slowly and forcefully depress the brake pedal several times to adjust the gap between the shoes and the brake drum in this way. At the same time, clicks of the triggered adjusting device will be heard.
Vehicles with rear disc brakes
13. Press the levers on the calipers by hand and release. The levers should return to their original position on their own. Otherwise, move the levers.
14. Pull the parking brake lever back.
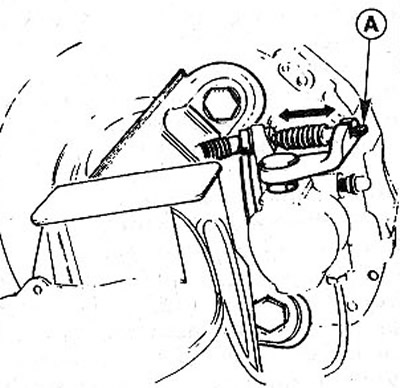
15. Tighten the drive cables so that endpoint A is against the drive lever, but the lever is not engaged (see illustration). For tension, screw nut I on the pin of the cable equalizer (see illustration 4.8).

8.15 Tighten the drive cables so that endpoint A is in contact with the drive lever, but the lever is not engaged
16. Adjust the tension of the cables so that the drive arm begins to recede in the position between 1 and 2 teeth, and completely retracts at the second tooth.
17. Tighten the parking brake lever 8-12 sector teeth to block the rear ears.
18. Release the parking brake lever and make sure the rear wheels turn easily.
19. Tighten locknut 1 (see illustration 4.8).
20. Lower the car on wheels.
